For the last few months, I've been working on-and-off on Ray1Map, which is an excellent tool for viewing/editing levels in 2D Rayman games (and other games using the same engines).
Recently we brought in a function to copy all the ETA/DES files (i.e. sprites and animations) from Rayman 1 and Rayman Edutainment into Rayman Designer. This should theoretically allow all the objects from these games to be used in Designer levels, but unfortunately, some of the code for non-Designer objects was removed altogether.
Still, I was hopeful that I could use letters, numbers (chiffres) and artworks/icons (used to illustrate words the player is asked to spell) from Edutainment without any issues. The reason for this hope was that the editor code still appears to contain references to these objects (known as MS_edul_*, MS_educ_* and MS_icon*), and their somewhat idiosyncratic operation. Before launching into my experience, let me say a few words about this idiosyncratic behaviour.
It took us a while to figure it out, but these objects make very strange use of the "HitPoints" value and the, ahem, "runtime" animation frame index. Each letter's sprite is actually an animated sprite with three frames (showing the letter in uppercase, large lowercase and small lowercase), but with an animation speed of zero. This means that only one frame (i.e. letter size/case) will actually show, and which one is determined by the initial animation frame index. In addition, the "HitPoints" value determines the colour of the letter, in a similar way to coloured Tings in Rayman Designer, and the multicoloured butterflies in the Cave levels.
The story is the same with numbers, which have multiple frames corresponding to different sizes, but it gets even more complicated with artworks. There are three groups of artworks, and each one is again a single animated sprite with several frames (one for each individual artwork) and zero animation speed. In this case, the "HitPoints" value is not used for colours, and indeed it seems to correlate with the frame index used for all the artwork objects in the Edutainment games. However, in actual fact, it seems that the "HitPoints" value is not used at all by the engine to decide which artwork to draw.
Instead, letters, numbers and artworks all do the same (rather unorthodox) thing: the "runtime" frame index value is set by the level editor and frozen at runtime! Once RayCarrot and I noodled all this out, Ray1Map was updated with full support for this weirdness. The Ray1Map editor can now set and save the "runtime" animation frame index for any object, but in the engine, this only affects letters, numbers and artworks.
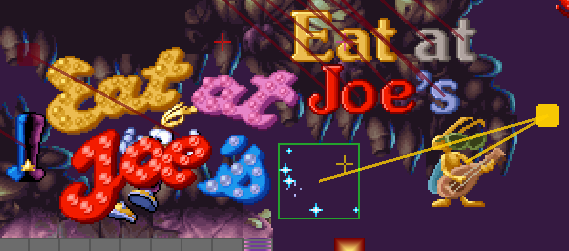
So anyway, with all this in mind, I used the latest functionality in Ray1Map to copy all the sprites and animations over to Rayman Designer, and decided to try placing various objects at the beginning of the first Cave level, "Peaks and Rocks", to test it all out. Here's what it looked like in Ray1Map:
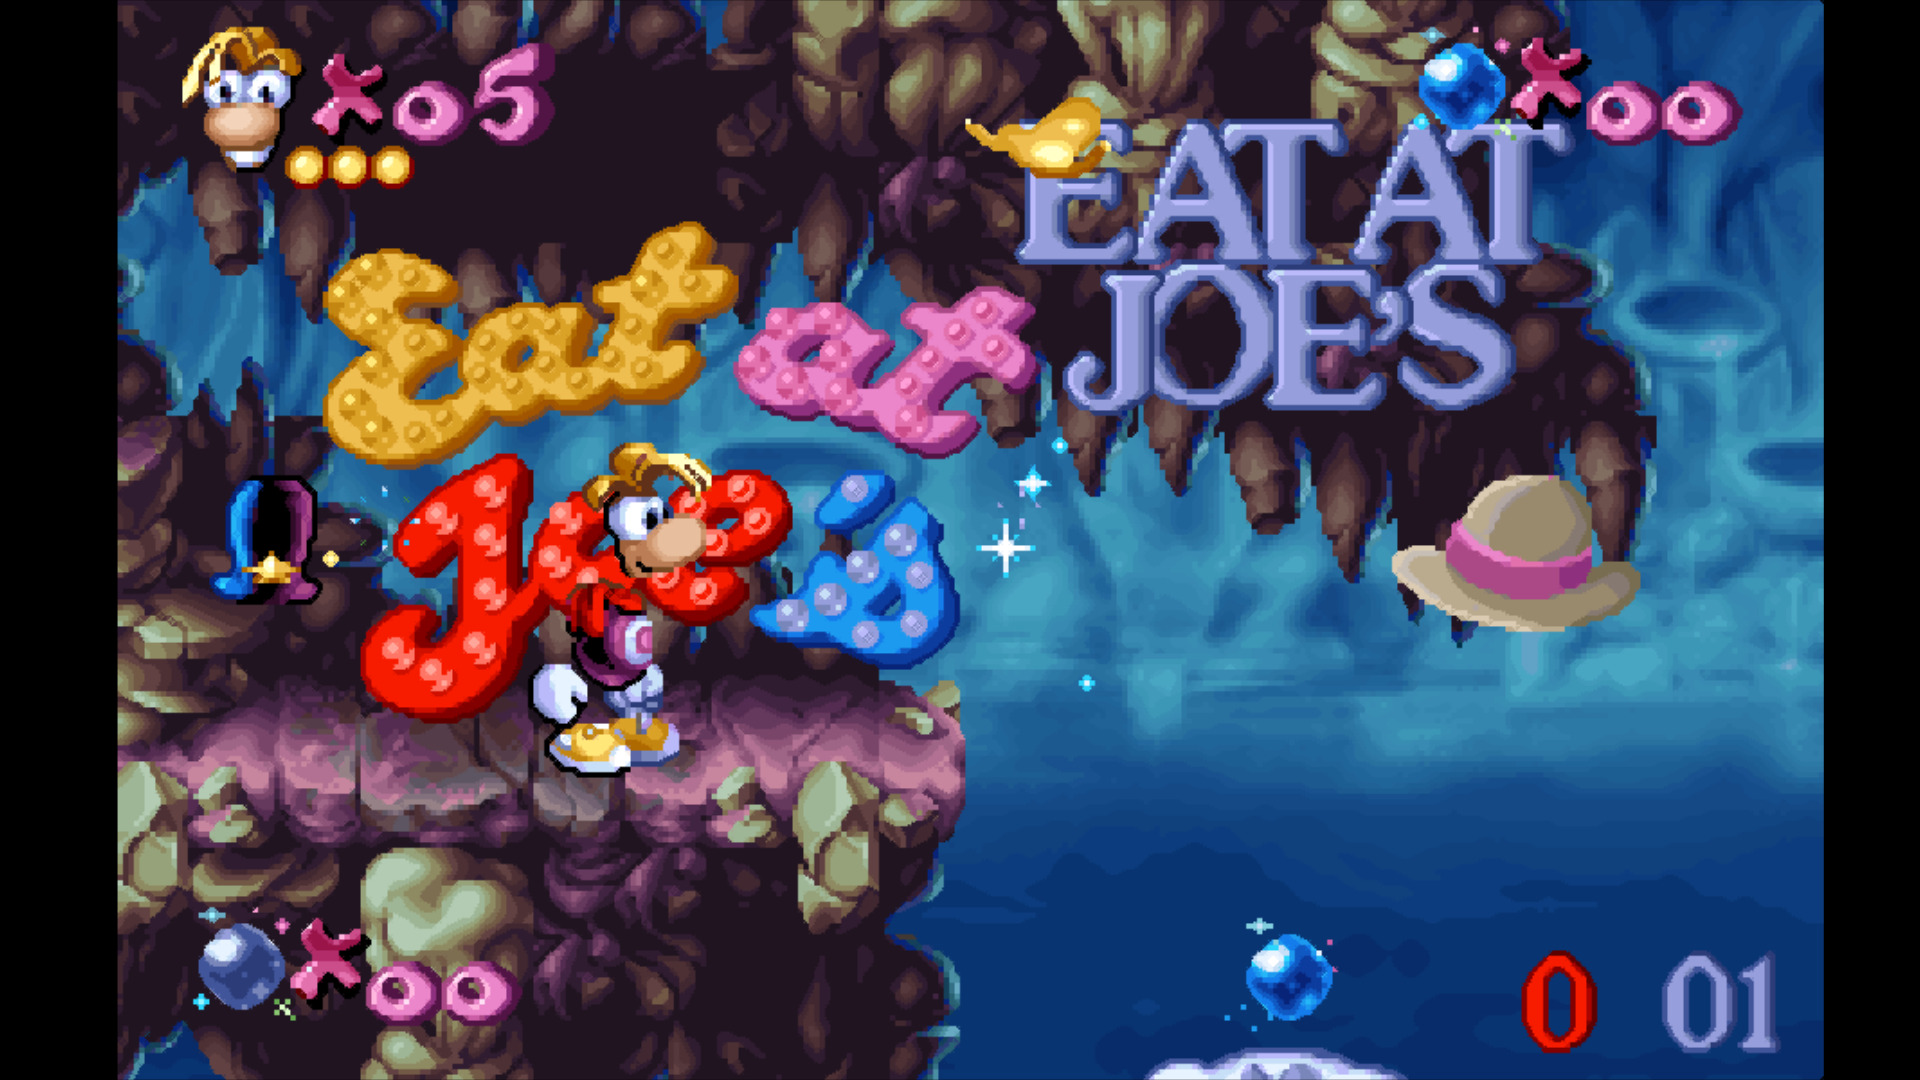
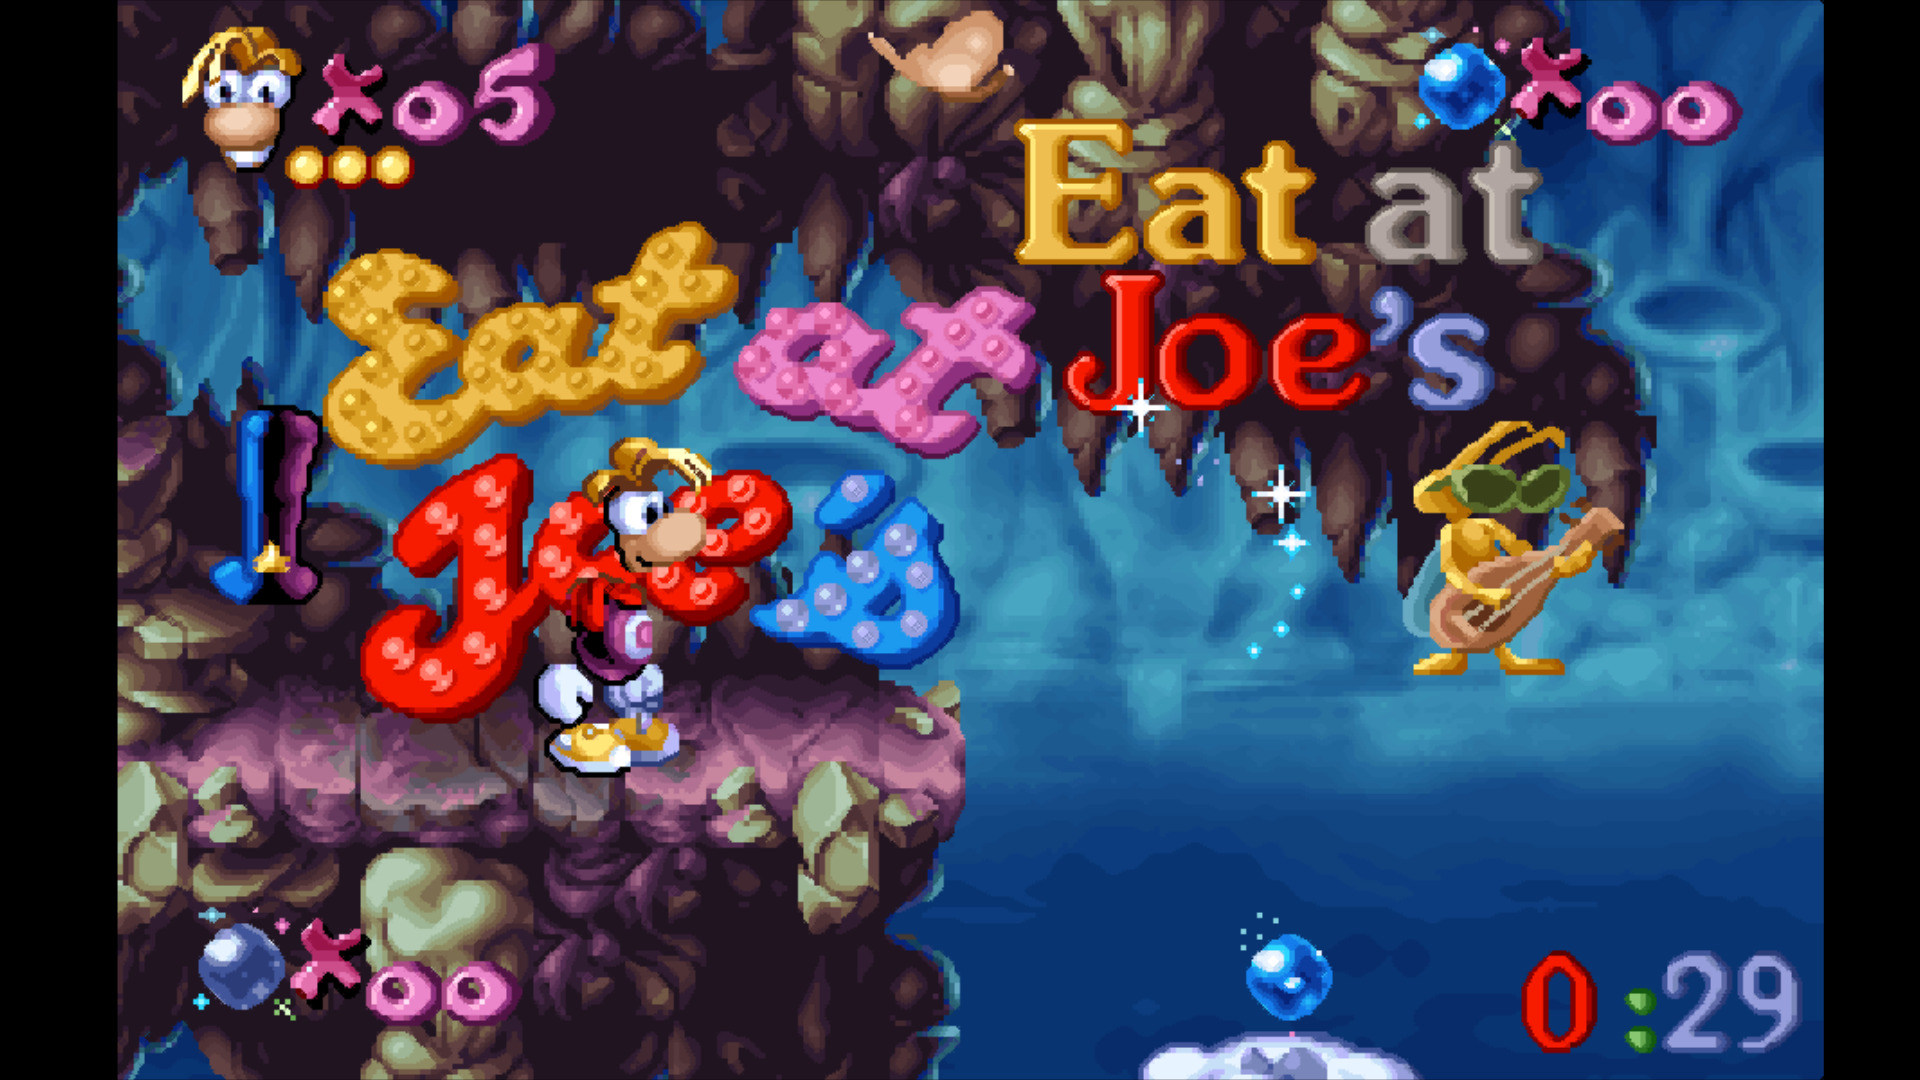
I placed a Magician hat, an "Eat at Joe's" sign from Rayman 1, the same text written using coloured letters, and an artwork of a creature playing a ukulele (I think…). Unfortunately, this is how it ended up looking when I loaded it up in the game:
You can see that my letters are all the default blue colour, and uppercase, and that my artwork has turned into a hat. The uppercase letters and the hat indicate that the frame-freezing code is not implemented in Designer, since each object has been reset to frame zero. The blue colour indicates that the HitPoints-colouring code, which certainly exists in Designer, is not applied to letters.
My disappointment soon turned to determination, however, as I realized that this is probably all governed by some simple conditionals in the Rayman Designer code, which could probably be patched! After all, I had already written a tool to patch the Rayman 1 EXE from the GOG version to honour the user's language setting instead of defaulting to English, and this probably wouldn't be too much more complicated.
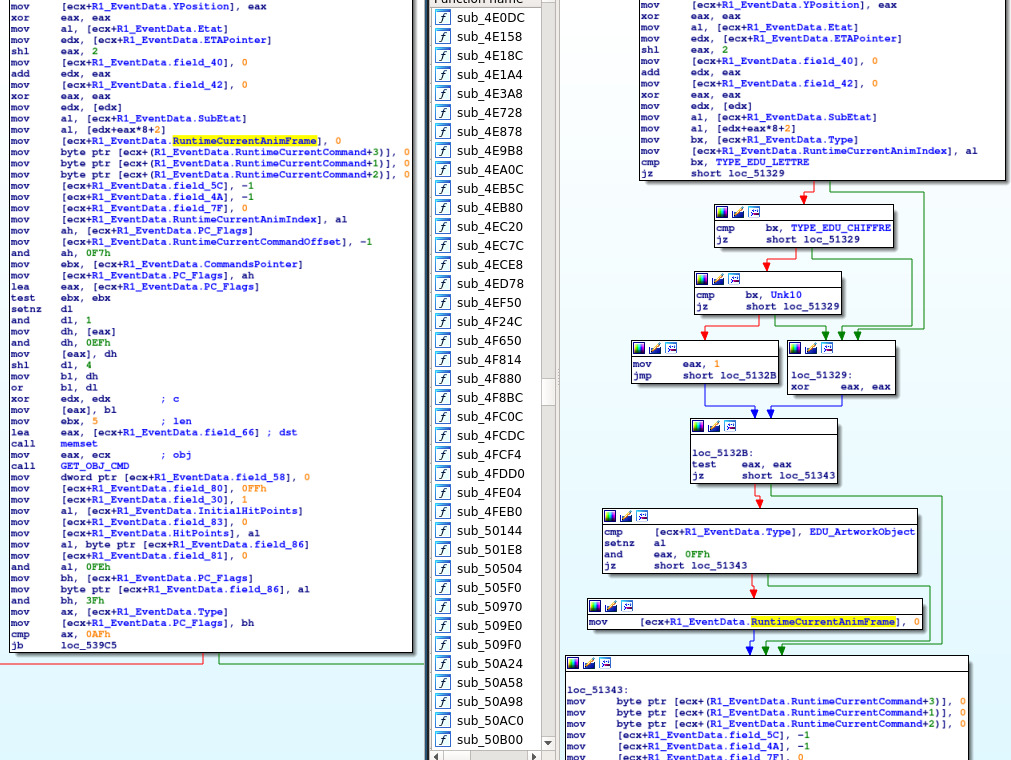
I fired up IDA, and started looking around the disassemblies of Rayman Designer and Edutainment (which I have thanks to a home-made EXE decompressor using my pmw1 Rust crate; on a side note, maybe someday I should try to write an IDA plugin to import PMW1 EXEs directly. Food for thought, though I don't know what's involved, so it may not be possible…). I did a text search in the Edutainment code for 106h (the hex value of the number 262), which is the object type for artwork objects (as can be seen here). I soon found myself in the obj_init function (deduced by comparing with my Rayman Designer disassembly, which itself I had been comparing with the Android Rayman Classic disassembly, which includes symbol names due to being in ELF format). After doing a bit of annotation (including the use of an R1_EventData struct definition from Ray1Map's code) here's what a side-by-side comparison of the two functions' disassemblies looks like – Designer on the left, Edutainment on the right:
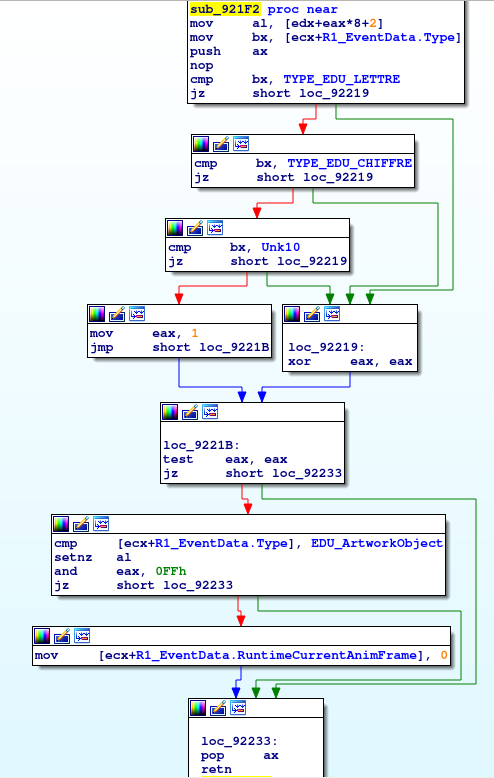
We can see that the two functions are identical up as far as the line mov al, [edx+eax*8+2], which is used to calculate the AnimIndex for the object. Next, Rayman Designer unconditionally sets the RuntimeCurrentAnimFrame of the object pointed to by the memory address in the ecx register to zero – hence my uppercase letters and hat! Rayman Edutainment, on the other hand, embarks on a bit of conditional logic, checking that the object's Type isn't TYPE_EDU_LETTRE, TYPE_EDU_CHIFFRE, Unk10 (seemingly another type of alphanumeric) or EDU_ArtworkObject before setting the frame to zero – otherwise, it leaves it alone! So, how to get the same logic into Rayman Designer?
Basically, what I needed to do was replace the single mov [ecx+R1_EventData.RuntimeCurrentAnimFrame], 0 instruction in Designer with the conditional blocks pulled from Edutainment. In practice, that's not really a good idea, since it would change the address of all the code following the instruction, meaning that a whole bunch of pointers would need to be fixed up. There is a simple enough way to do it though: take all this conditional code in the Edutainment EXE and hive it off into a little function, append it to the Designer EXE's code segment, and replace the single instruction with a call to that function. The code should fit in there really snugly, since it doesn't call any other functions, or reference any fixed locations in the Edutainment data segment. In fact, it even uses the same registers for everything, so it should be just plug and play.
What about replacing the mov with a call? Well, that's slightly problematic, since the offending mov instruction is four bytes long, whereas a call has to be five bytes (one byte for the call opcode, plus a 32-bit function offset). The solution is to include the mov al, [edx+eax*8+2] instruction in the new function, and then replace the two mov instructions (eight bytes) with a single call and pad the remaining three bytes with nop.
Speaking of the mov al, ... instruction, there is one more problem. In Designer, the program waits a while to use that value of the al register (in the instruction mov [ecx+R1_EventData.RuntimeCurrentAnimIndex], al), since there's no pressure to do so. Whereas in Edutainment, the eax register (of which al refers to the lowest eight bits) is used immediately afterwards for keeping track of the conditionals, so the code uses the value of al straight away.
One solution to this would be to nop out the later use of the al register in Rayman Designer, since the earlier use is already included in my new function. However, I decided that making two separate modifications to the original Designer code would be a bit inelegant. Instead, I opted to replace the use of al in my function with a push ax instruction (plus nop-padding) to store the value on the stack, then put a pop ax at the end of my function before the final ret (ax being the lower half of the eax register, containing ah as well as al).
So anyway, as I was figuring all this out, I was writing a Rust program to actually carry out these modifications. At this stage, I was basically up to line 162 of this file, plus some of the write-out code at the end. I tried it, and, to my delight, the patched Rayman Designer EXE ran! However, when I got to the world map, Dosbox crashed, stating:
Exit to error: IRET:CS selector beyond limits
A little debugging revealed that, beyond the first few instructions, my function was getting overwritten by data. Shoot! I soon realized, however, that while my Rust crate updates the uncompressed_size of a section (or "object") when update_data is used (as it was in my program), it leaves the virtual_size untouched. The virtual_size tells PMODE/W how much memory to allocate for the section, so when I was making the section bigger without increasing its virtual size, of course the end of it was getting overwritten! It is legitimate for a virtual_size to be bigger than the uncompressed_size (that's how it makes room for the stack and the heap in the data segment), but I'm not sure about smaller! (So, this can probably be considered a bug in my crate!) Still, the issue was easily solved (without messing with the crate's innards) – see lines 253-254 in the code I linked above.
Having sorted all that out, the new EXE rendered this:
That's already a big improvement – the letters now line up as I expect them to, and the artwork is the one I intended, but I still needed to sort out the colouring of the letters. Before I get to that though, let me just show what the changes to the code look like so far in the disassembly. Here's a comparison of the original (left) and patched (right) Rayman Designer obj_init functions:
You can see that two of the mov instructions have been replaced with call sub_921F2, followed by three nop instructions for padding. And this is what the brand-new sub_921F2 looks like:
Side note: this sub_921F2 is actually located at position 0x841f2 in the code section. I had asked IDA to load the file with a 0xe000 offset so the addresses line up with the runtime addresses I see in the Dosbox debugger, but I have since realized that the problems with this approach outweigh the advantages.
Once that was done, I needed to move onto the colours! As I expected, I had found some code checking object types in the display2 function in Designer, to decide whether or not to use the "HitPoints" values to colour them. Again, by doing a text search for the hex form of one of the object type numbers, I was able to find the analogous piece of code in the Edutainment executable. Here is a comparison of their disassemblies, again after suitably annotating them in IDA:
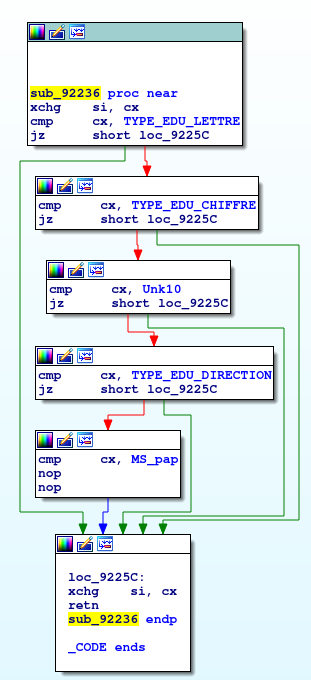
So, in Rayman Designer, objects of type MS_pap (Cave world butterflies), MS_wiz_comptage (coloured Tings) and MS_compteur (coloured-Ting gendoors/kildoors) get coloured according to their "HitPoints". In Edutainment, the types are TYPE_EDU_LETTRE, TYPE_EDU_CHIFFRE, Unk10, TYPE_EDU_DIRECTION (road signs) and, again, MS_pap. Apart from the fact that there are more conditional branches in the Edutainment version (since the list of types is longer), the structure is very similar. The registers don't line up as well as they did in the other piece of code – Designer stores the type in si, whereas Edutainment uses cx. Otherwise though, this again looks like good code to pull across – no references to fixed memory locations or calls to other functions.
As I recall, I tried quite a few over-engineered solutions (that nevertheless worked) before realizing that I could just pick up the conditional blocks from Edutainment, nop out the final jump (i.e. the jnz instruction), and replace the first cmp in Designer with a call to the transferred code. I also needed to add an xchg si, cx instruction at both ends of the transferred function, to account for the register difference I just mentioned. The best part is, the cmp instructions here are five bytes long, so they're the perfect size to swap in a call!
Here is a comparison of the Designer disassembly before (left) and after (right) patching:
The only change is the replacement of cmp si, MS_pap with a call to a newly-added function, which looks like this:
Each cmp instruction sets the zero flag if the operands are equal. When the flag is set, the following jz instruction then jumps to the end of the function (or more specifically to the final xchg si, cx). The final cmp obviously doesn't need a jz instruction, since it's already at the end of the function. The nop instructions are there to replace a jnz (the opposite of jz) which was present in Edutainment to jump to the code for non-coloured types, but which we don't need here.
When this function returns, the zero flag is set if the object's type is equal to any of the five mentioned, or cleared if it is not equal to any of them. Therefore, the jz instruction after the call back in display2 now does exactly what we need it to do: if the object type is on Edutainment's list of coloured types, it jumps into the colour code; otherwise, it moves onto the next check, which is if the object is of type MS_wiz_comptage. Cool, eh? Of course, this would've been a bit more complicated if Designer and Edutainment had not had MS_pap in common as a coloured object type!
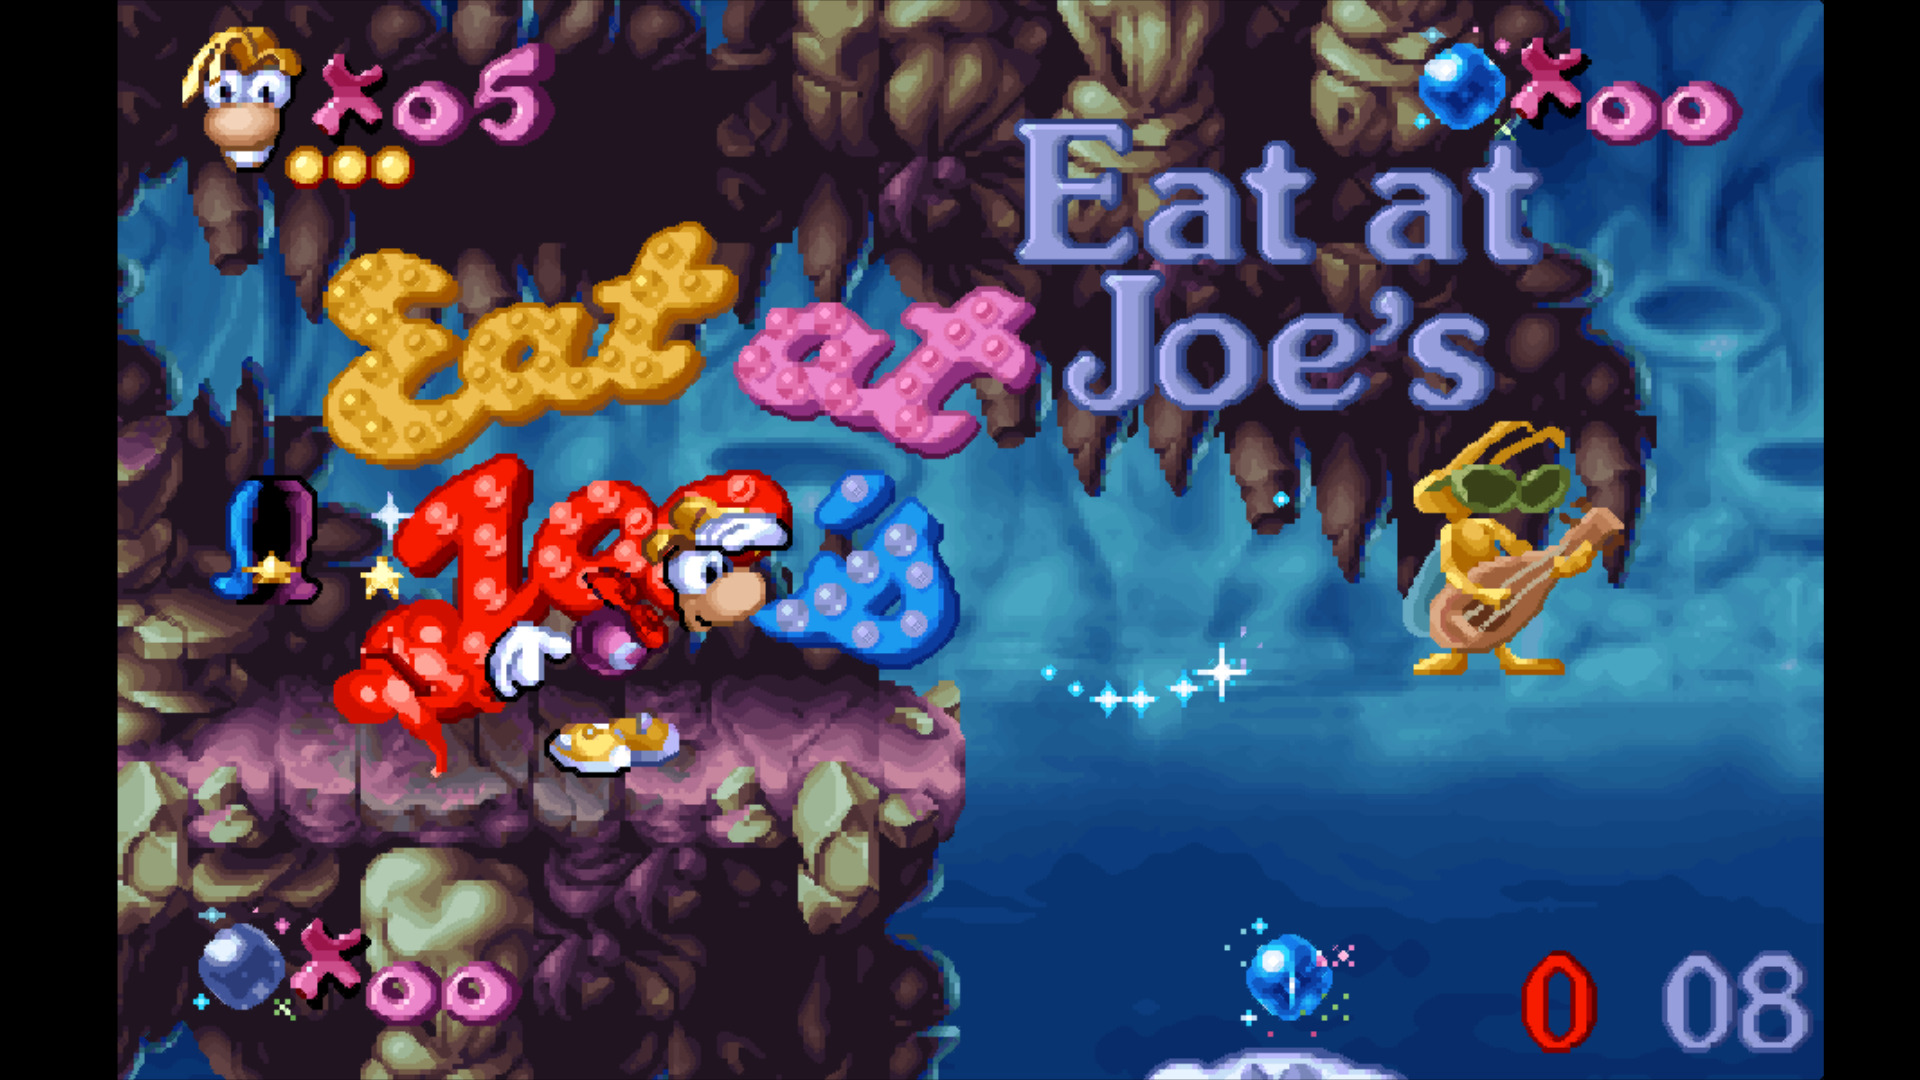
Anyway, with all that figured out, my patcher was essentially in its completed state, as you can see it in the GitHub link I mentioned earlier. And this is the result:
Not bad, eh?
Of course, a considerable flaw with this patcher is that it currently works only with the exact versions of the Designer and Edutainment executables that I happen to have. For Designer, it's probably reasonable to expect many fans to have the same version, as it's the one that's sold on GOG. Edutainment, however, is not on GOG, so there's no reason to expect everyone else to have the same version, since I know for a fact that the one I have is not the only one. Since the code I'm copying over is so small and so simple, I should really include it in the patcher as a blob, rather than trying to extract it from an executable that the user may not have. I plan to do this in the next version, very soon.
Now, one might ask what else is possible! I suppose, theoretically, it might be possible to port over all the code that was removed, so that, for example, Skops actually works instead of doing this:
However, this would be a considerably more involved project, since this more complicated code calls functions and references global variables, some of which may have been completely removed from Designer. Fix-ups would have to be applied to all function calls and global variable references, maintaining a database of where all these objects are located in the Designer executable. I think it's theoretically possible, but I don't think I'll be sitting down to do it any time soon!
There are probably some simpler enhancements I could bring in though. For example, it's probably possible to add an option to make gendoors/kildoors soundless by changing their HitPoints values. While I'm looking into that, I might also explore the possibility of upgrading the patcher to a GUI tool, with the option of applying and reverting different independent patches. For example, one could choose to bring in the frame-freezing code here, or the letter-colouring code, or both, or neither.
Watch this space!
